

Learn the fundamental and common beginner techniques that every guitarist must know.
7 Beginner Playing Techniques
This lesson will teach you the following 7 techniques
- Pick holding
- Fretting
- Hammer-ons
- Pull-offs
- Bends
- Slides
- Vibrato
Holding a Pick
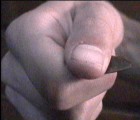
Holding a pick properly will ensure that you can play as fast as possible. The goal is to have a firm grip so it plucks the string firmly with both downstrokes toward the floor and upstrokes toward the ceiling. The proper way to hold the pick is between your bent index finger and thumb. The amount that it sticks out is a personal preference, and it might also affect the stiffness of the pick that you prefer.
Do not pinch the pick. Pinching makes it harder to play fast because it makes it harder to use your wrist and elbow to help you play. It can also lead to an uneven picking angle. Remember, Holding a pick properly will prevent bad habits that slow down your playing.
Fretting Notes
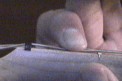
Fretting a note is one of the most basic skills for playing the guitar. Many guitarists have formed bad habits that slow their playing. The most important point is to have a proper finger arch so you touch only the string that you want to fret. It also allows you to reach every string. To do this, your thumb usually needs to be placed behind the neck and not over it. Playing closer to the fret also lessens the potential for buzzing.
While fretting, strive to have a light touch. Pushing too hard will slow you down.
Hammer-ons
Hammer-ons and Pull-offs produce a legato sound on a single string. Legato is sounding notes so they connect smoothly. For guitar, this means you don’t separate the notes by plucking the string again on the second note. Both hammer-ons and pull-offs are notated with a slur. The only distinction between the two techniques is that hammer-ons slur to a higher pitch while pull-offs slur to a lower pitch.
Executing a Hammer-on
- Fret a note.
- Pluck the string.
- Without releasing the first fretted note, quickly hammer or push down the second note without plucking the string again.


Pull-offs
Pull-offs are the exact opposite of hammer-ons. To play a pull-off, you play a note then you fret a note behind the one you just played, finally you pull your finger off the first note without re-plucking the string. Like hammer-ons, the notes will transition smoothly.
Executing a Pull-off
- Fret the first note.
- Pluck the string.
- Without releasing the first note, fret the second note with another finger.
- While keeping the second note fretted, quickly release the first note. Do not pluck the string again.


String Bending
Bends are a great way to add interest to your playing. Bends raise the pitch of the note. The amount of pitch change depends on the distance you bend. Usually, you want to change the pitch by a half step or a whole step. Sometimes you want to change it even more, but you’ll need some good calluses on your fingers for that!
Executing a Bend
- Fret the first note.
- Pluck the string.
- Without raising your finger off the fretboard, slide it vertically up or down (parallel to the fret). Bend until you hit the target pitch, which is the second note.
When notating bends in tablature, it usually indicates how many steps to bend the note (example: 1/2, full, 1 1/2). Since each 1/2 step is equal to one fret, you can test to make sure you’re bending the proper amount. For 1/2 step bends, bend the note until it’s the same pitch as next fret (ex: Bending the 10th fret bent a 1/2 step is the same pitch as the 11th fret). For whole step bends (labeled full in tablature), bend the note until it’s the same pitch as the note that is two frets up.


Pre-bending
Pre-bending is performed by bending the note before plucking the string so the pitch of the bent note is sounded. This is usually followed by a release (explained below)
- Fret the note.
- Push or pull the string vertically.
- Pluck the string.
Release
Releases almost always follow a pre-bent note. Often, they follow regular bent notes as well. Releasing is the act of returning to the unbent note without letting go of the string. It’s done by reversing the bending process so you start with a bent note and end with a normal fretted note.
- Bend or pre-bend a note.
- Pluck the string.
- While continuing to fret the note, return the string to an unbent position.


Sliding
Slides are executed on a single string. You play a note then slide your finger up or down the fretboard to a second note without taking it off the fretboard.
Sliding up is in the direction towards the bridge (raising the pitch of the note). Sliding down is the direction toward the neck (lowering the pitch of the note).
There are two types of slides: shift slides and legato slides. They are the same except shift slides pluck the string again on the second note. In my experience, most slides are legato slides.
In notation, both use a diagonal line to denote a slide. Legato slides add a slur, which is a curved line that connects two notes. It is means to play the two notes as smoothly as possible. On guitar this means not to pluck the string again.
Executing a Slide
- Fret the first note.
- Pluck the string.
- Without releasing the string with the fretting hand, slide your finger up or down to the next note.
- If performing a shift slide, pluck the string again.
Note: in the exap


Note: use your ring finger for the slide in the example so you can play the 3rd fret of the 2nd string easily.
Vibrato
If you ever watched B.B. King play, he has one of the best vibrato techniques out there. He uses the ball of his hand (the joint where your finger attaches to your hand) as a pivot point so he can use his wrist muscles to pivot his hand while fretting a note. This motion pulsates the pitch of the note. You can emulate this sound with your voice by singing a note and pushing on and off your chest.
Executing Vibrato (Method 1 – Pivot Vibrato)
This type of vibrato mainly pulls the string downward as you pivot around the ball of your hand. This is the most common form of vibrato and the easiest to execute.
- Fret the note.
- Pluck the string.
- While continuing to fret the note, pivot your hand back and forth around the ball of your hand.

Executing Vibrato (Method 2 – Upward Vibrato)
Sometimes it’s hard to use the first method of vibrato because you are playing on the first string and pivoting pulls the string off the fretboard. Pivot vibrato also fails when you want vibrato on an upward bent note (one whose string you pushed upward instead of downward). Upward vibrato often uses your whole arm to create.
There are a two variations of upward vibrato. The first variation uses the weight of the guitar and your arm movement from the elbow up. The second variation uses your hand muscles to produce the vibrato.
Weight-based Upward Vibrato (or Arm Vibrato)
- On the back of the guitar neck, place your thumb near the bottom so more weight is placed on the fretting finger.
- Fret the note.
- Pluck the string.
- Like a bend, hold the fretted note but modulated up and down with your arm from the elbow down. Sometimes the weight of the guitar can help you execute this type of vibrato.
Squeezing Upward Vibrato
This method is harder to get a fast vibrato, but it is sometimes used.
- On the back of the guitar neck, place your thumb near the top so you can easily squeeze the neck.
- Fret the note.
- Pluck the string.
- Squeeze your hand around the neck of the guitar and use your hand muscles to squeeze the note back and forth. This is similar to bending up and down quickly.

Conclusion
Different techniques give you different feels, but all of them are great for adding some interest to your playing. Properly executing these seven techniques will allow you to form a solid base for any style of playing guitar.

Thank you for the information. This information is very helpful for beginners like me
Although I have not yet tried the lessons out,the topics tell me they are brilliant
Thank you. I hope you get a chance to try them all out!